Big Block Baby Quilt
Thinking about inspiration...the muse mystifies me. Here I was, steadily working along on a planned Christmas quilt, all the blocks together and ready for the border to be added to finish the quilt top.
But then I was diverted by a creative urge.
My friend texted me that her brand new grand baby was in the hospital and asked me to pray for him. Maybe it was that time spent in prayer, reflecting on that wee one, that set the gears in motion. Later, while searching a pile for a particular fabric color, I came across Maureen Cracknell's "Moon Stories in Spark" with the adorable bunny rabbits.

And then, of course, that reminded me of my recent acquisition of Rashida Coleman-Hale's adorable night sky fabric...(I love this print so much, I just ordered another yard).

Once I saw the big block tutorials from Kitchen Table Quilting, the idea was suddenly a full visual in my head...baby quilt! Who is going to stand in the way of that?
(My husband has resigned himself to the raised eye brow when he sees me starting a new quilt project.)
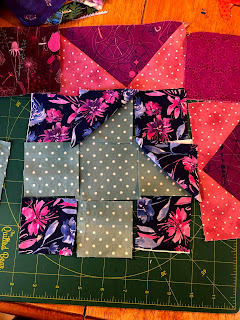
I wanted to go with some deep colors that fit with the hues of twilight in Maureen Cracknell's print. I am definitely not drawn to pastel baby colors, as you can see.
I started with this basic plan of the big block pattern.
But something just wasn't working for me.

First, I tried moving some blocks around. When that didn't work, I figured the blue was too dominant, so I revised the blue rectangles to half-square triangle blocks with the Kaffe Fassett polka dot. That helped. I tried out a few different borders, but ultimately decided to just go with the night sky fabric.

You'll notice little tweaks in block placement and half-square triangle directions along the way.

Finally, I was happy with the color coordination and block layout. To the quilt sandwich table we went. I used the clamps on the edges, but I also stabilized the backing and quilt top with some well placed masking tape. I tried duct tape once, but it took forever to remove the left over residue of the tape from the table. Never again!

All pinned up and ready to stitch. I had the greatest delay at this stage because I am always soooo indecisive about how to quilt it! I considered a free motion stipple pattern, straight lines up and down and across, or hand tying it. This is the stage where I feel the greatest doubt in the quilting process.


I finally decided to stitch in the ditch, and then stitch Xs in the rectangles and squares. I didn't want to over quilt, because I want this to be a fluffy warm snuggle quilt.
And in the end, it gives the appearance of lines in a constellation. Works for me!


Now, what kind of quilt journey would this be if I didn't walk right into one of my classic blunders? I had the wise idea to stitch straight lines in the border. Of course, just about now my sewing machine's stitch count, or whatever you call it, went a bit haywire. Instead of some nice fat stitches, suddenly they were tiny and causing the fabric to bunch. You know how sometimes the alert goes off in your head that something isn't working right, but you brush it aside and forge ahead?
Boy, did I pay for that. A full afternoon with the seam ripper. GRRRRRRR.

I ended up trimming the border down a bit and not doing any stitches in it.
A bit of a game changer here. I decided to round the quilt corners. I just used a canning lid to mark a curve and then trimmed it down. While the hand stitching of the edging is my favorite part of the quilt journey, the corners, not so much.


Washed and ready to go. It is going to be a wonderfully cuddly quilt.

Happy added her mark of approval as well!

Delivery set for this Saturday.

I do need to turn my focus to school work now, but there are some hand sewn cloth napkins and a Little Miss Sawtooth quilt-along vying for my attention, so we will see which force is the strongest.


Comments
Post a Comment